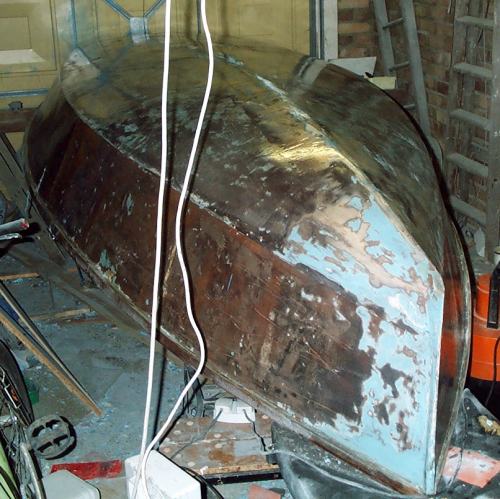

With the paint more or less removed I started by sealing the surface with a layer of epoxy. SP106 would be the obvious choice, but I used SP320 because I had some round the place that needed using up. A lot of this will get sanded down again when material goes on - there will be a couple of thicker coats of SP106 later. In order to get it to sink well into the surface I thinned the epoxy down some. This is absolutely not a recommended procedure by SP, and not what you'd wish to do for the real surface, but SP to have an Epoxy primer which is basically a thinned coating resin as I understand it, and I used the thinners from this and took it down to a lowish viscosity and brushed it on. Other brands from other suppliers - and quite probably other formulations from SP - are quite OK for thinning down by the way. I'll check when I get towards that stage.

And here we have a shiny boat all sticky with new epoxy! The bow sections are a pain to sand or strip - there's a lot of filler there so heat and chemical were difficult to use, and sanding is prone to lose wood on such curved surfaces. In the end I left quite a lot of paint where it was really thoroughly attached. You can see blotches on the rest of the boat where there's still a significant amount of primer left. They're 3mm ply, remember, and you just cannot be too aggressive with them. Maybe I should be, I don't know. We'll find out in 10 years time!
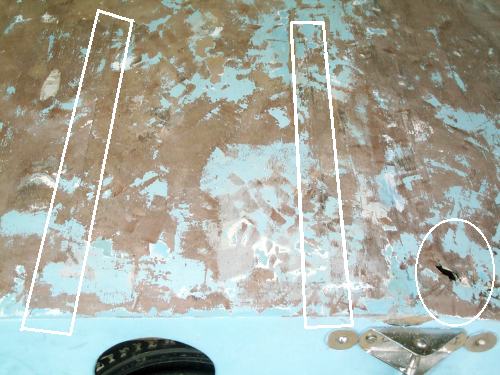
Anyone who's ever done any restoration work on wooden boats
will tell you about nasty surprises. These are why all wooden
boat projects take far longer and cost far more money than is
ever guessed at the start.. Here we see some nasty surprises that
were waiting for me when I stripped the paint off the bottom of
the hull. Bottom right, in the circle we have a hole right through
the bottom skin, which was filled with a soft filler of the car
body repair type. By the looks of the wood in this area there
has been a bit of rot here in the past - perhaps from the pool
of water in the stern that has damaged so many wooden boats left
in dinghy parks. However its not serious, and I was hardly worried
when I found it. There's certainly no trace of rot now.

More serious are the two cracks which are outlined in rectangles.These are an excellent example of the classic hard point failure on wooden boats. One is just adjacent to the hog, the other to the first stringer, and in between we have an area of plywood with very little support. It seems to be a fairly recent failure - I can't detect much sign of paint in the cracks, and I'm inclined to think that this might be "off the water" damage in the last few years - maybe some one sat or stood on the boat when it was upside down in the front garden. Anyway, it will need careful repair to get back to strength. I am minded to take down the outer layer of ply a little and use unidirectional carbon to strengthen the wood again on the outside, while the inside will get a layer of glass or two from chine to stringer. There's already similar reinforcement in the crew area from the Weston repair.
Another significant job is an area of topside where there are again cracks near the hard points, towards the chine and the gunwale. This one looks as if its the normal off the water bash in the topsides that 3mm ply boats are so prone to. Here though the wood is no longer lying but has distorted, so probably a ply plate on the inside will be needed to get the shape back in the topsides. I shall have to see if I can get good quality 2mm ply for this sort of job - there's an aviation model shop locally.
More problems on the second Problems Section.